Painting your home can be a very gratifying project. However, it’s important to take a measured approach to this project so that you get the best results possible.
Painters Bunbury have a lot of institutional knowledge about how to make a room look crisp and clean. This includes many small things that may seem obvious to them but are not always known by the average homeowner.
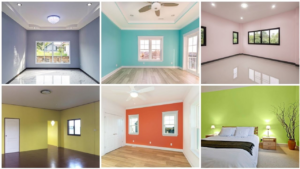
The right colors can help set a room’s mood and make it feel like home. However, deciding on the ideal shade can be daunting with so many paint color options out there. Thankfully, there are some steps that can be taken to make this process more manageable for homeowners.
Before you buy any paint, take a look around at what you have in the room, advises interior designer Erika Woelfel. It’s important to choose a color that will coordinate with the colors of furniture and decor that will remain in the room, as well as any wood detailing and flooring. “Also consider the surrounding space and any adjacent rooms,” she says. “The color you pick can change depending on light and the colors of your yard and neighboring houses.”
Once you’ve narrowed down a few potential options, test them out in the room. Use repositionable swatches that can be easily moved around the walls so that you can see how they will look at different times of day and in various lighting conditions. The color you love in the morning might look too bright in the afternoon or may be too dark when the sun goes down.
If you’re unsure where to begin, browse design/decorating magazines for ideas or even look at your closet for inspiration. The colors that fill your clothes, shoes and purses can give you an idea of what you’re drawn to and a starting point for the color palette for each room.
A color wheel is a great tool to have on hand when choosing paint colors, advises designer Erica Lugbill. The color wheel helps you understand how a color works with the other colors in the room and how it can be toned down or used more boldly depending on your needs.
Also, don’t be afraid to try more saturated colors as long as you’re using the highest-quality paint available. Lower-shelf brands often have a chalky or dull finish, which can detract from the overall look and feel of your room. If a color is too intense for you to be comfortable with in an entire room, consider using it as an accent on doors or trim instead.
Homeowners tend to focus on the selection of paint colours and brush or roller, but one important step is often overlooked or rushed: surface preparation. This is the first step to a good paint job and enables you to achieve long-lasting results.
Surfaces need to be thoroughly cleaned to remove dirt, dust, mildew and other impurities. This can be done using a pressure washer that uses a jet stream of water to blast away the contaminants. If the surfaces are extremely dirty, you may need to use a chemical solvent before washing. Using a broom and vacuum cleaner is also a good way to clear up any remaining debris.
If the walls or other surface have been painted previously, it’s essential that they be thoroughly sanded down. This ensures that the new layer of paint will adhere to the surface and prevent peeling in the future. You should also check that the previous paint is water-based, rather than oil based. If you’re unsure, test by rubbing a small area of the wall with nail polish remover or denatured alcohol. If it comes off, the previous paint is probably oil based.
The walls should then be washed with water and a mild detergent to wash away any dirt or grime that remains. This helps to prevent bubbles from forming under the paint later on. It’s also a good idea to wash any surfaces that have grease or fat on them as this can prevent the paint from adhering.
It’s also a good idea to sand any rough or uneven areas of the walls before painting. This creates a smoother surface and reduces the amount of paint needed for adequate coverage. You should also fill any cracks, holes or dents in the walls with a suitable filler or putty.
Finally, it’s a good idea to protect adjacent surfaces and furniture by covering them with canvas drop cloths or plastic sheets. It’s also a good idea for homeowners to move any furniture that they can’t remove and tape plastic around any fixtures, light switch and outlet covers and vent or return covers in the room.
Whether you’re painting an entire room or just one wall, it’s always best to start with a clean surface. This will remove dust, cobwebs and grime that can prevent the paint from adhering to the walls. A simple cleaning can also help to hide any permanent marks or stains on the walls that you might not be able to get rid of completely.
For interior paint prep, it’s a good idea to sweep the surfaces and vacuum any carpeting. Afterward, you’ll need to wipe down the walls and trim with a damp cloth or sponge to remove any dirt or grime that’s on them. This will give you a smooth surface to work with, and it will also allow the new coats of paint to adhere properly.
It’s also a good idea to sand any areas of the walls that aren’t smooth. This will make sure that the new paint can cover any bumps or ridges and give the room a professional-looking finish. You can use a handheld power sander or a piece of fine sandpaper to sand the walls. This is especially important if you’re using a different color than the previous paint.
Lastly, it’s a good idea to move any furniture out of the room or to the center of the room so that you can easily access the walls. You should also put down tarps to protect furniture from paint drips and splatters. You’ll want to make sure that you have all of the supplies that you’ll need for the project before you start, so that you don’t have to stop working to go get a can opener or a screwdriver.
If you’re painting the exterior of your home, it’s a good idea to clear out the area around the house and cut back any plants that are close to the house. This will allow the painters to easily cover the plants with drop cloths and will also give them easy access to all of the areas of your home that need to be painted.
Before beginning the painting process, make sure that you’ve removed all of the furniture and opened the windows to allow for proper ventilation in the room. Putting down protective covers on the floor and covering hardware like doorknobs is also an important step to prevent splatters, spills or other potential accidents from damaging surfaces that you’ll need to work on later.
Apply the paint in small sections, starting with the cut-in edges. This is an area that can be difficult to paint with a roller without creating buildup, so applying it early on will help you get the job done more quickly and easily.
Once all of the trim and baseboards have been painted, start on the rest of the wall. If you’re using a roller, it’s a good idea to pre-roll the entire surface of the room to avoid creating any lines or spots of uneven paint in the final product.
If you’re working with a brush, begin by lightly touching the surface of the wall with it, using a light touch. This allows you to see any underlying color that’s picked up by the new color you’re applying, and wipe it free of any excess or moisture before making another stroke.
Afterward, you can finish by going over the new paint with a softer brush to smooth out any evidence of brush marks or tones. This can be particularly useful when working with a medium that tends to level out any marks, such as one containing stand oil or copal varnish. However, be careful not to blend too much, as this may result in a flat, dull surface that lacks texture and impact.