Author: George Fowler

What Do Deck Builders Do?

Deck Builders are contractors who construct new decks using various materials. They offer design consultations, install add-ons like railings and lighting, and provide cleaning services.

A good contractor should be able to provide proof of license and insurance coverage. It is important to review their portfolio and previous projects carefully. Click the https://jrcsi.com/ to learn more.

To build a deck, a contractor needs to have certain skills. They must be able to frame and install decking and stairs and understand how different materials affect cost and longevity. A professional deck builder with years of experience in all of these areas will be able to help you choose the best materials for your project.

In addition, a contractor should be able to provide a detailed estimate of the cost and a timeline for completion. They should also be able to explain any unforeseen issues that may arise and have a plan in place for dealing with them.

Another important question to ask is whether or not the contractor provides a warranty on their work. A warranty will protect you in case something goes wrong with your deck after it’s built. A good Deck Builder will stand by their work and offer a warranty that covers the material as well as the labor.

Some contractors have dedicated salespersons to handle customer queries and keep clients updated. Others have a design team or a project manager that connects with the client throughout the process. If a builder does not have a designated point of contact or is not transparent about their communication, that’s a red flag.

You should also inquire about what types of materials the contractor offers and why they chose those particular ones for their projects. For example, some builders only use pressure-treated wood, while others specialize in composites. These different materials each have unique benefits, costs and maintenance requirements. A contractor should be able to clearly explain why they recommend one material over another and how each will affect your project’s overall cost, longevity and aesthetics.

It’s also a good idea to find out if the contractor will be pulling a permit for your project. This step is vital to ensure that your deck is up to code and meets local building regulations. If your contractor doesn’t want to pull a permit, it could be a sign that they’re not reputable or experienced. In this case, it’s worth looking elsewhere for a contractor.

Design

Deck design involves more than just the dimensions and location of the deck, but how you’ll use it. A deck for entertaining guests will require a different design than one that’s just for sunbathing. Considerations like how many guests can comfortably sit on the deck at once, how much shade you’ll need, and whether or not you want to include a dining table or fire pit will influence the overall layout of your new deck.

When hiring a deck builder, you’ll want to find someone who has the right experience and qualifications for the job. Look for builders who have plenty of satisfied customers and a portfolio of previous work that demonstrates their skills. In addition, ask potential contractors if they have any additional training or certifications that may help them meet your specific needs.

Building a deck is a complex project that requires special tools and construction methods. For example, an on-grade deck typically requires concrete piers on which beams and joists are fastened. Framing hardware such as post bases and joist hangers are used to join joists together. Decking (what you walk on) is then fastened to the joists with screws or nails from the top and “invisible” fasteners from below.

A deck builder’s knowledge of building codes is also crucial to the success of a project. These guidelines set maximum load and span limits, specify minimum joist size, and provide detailed information about structural requirements for your specific climate. The codes also provide recommendations for deck materials. For example, it is important to choose a rot-resistant material that will not need staining or painting.

Most deck-building games feature a collection of cards that players curate to make their individual draw deck more effective. Various ways to do this vary between games, but most involve the players adding cards from a pool to their hand or discard pile in order to increase the chances of drawing more desirable cards. The process can be fun and engaging, but it’s important that players understand how to optimize their cards in order to win.

Materials

Whether a deck is constructed from wood, composite or another material, it needs to be strong and stable. It is important that your deck be built by a professional to ensure that it meets local building codes and withstands the elements.

You should always ask for samples and pictures of their work before hiring a contractor. Also, request proof of licensing and insurance. This can help you avoid scams and hiring inexperienced contractors. It is also wise to ask potential builders for referrals from previous customers. This can provide you with an idea of their workmanship, communication skills and project management style.

Decks are made from a variety of materials including wood, stone, concrete and composite. Each has different benefits and price points. Wood is renewable and versatile, making it an attractive option for a deck. It is also lightweight, which reduces the stress on your house and foundation. However, it can be splintery if not treated regularly with a preservative.

Most modern decks are constructed with pressure-treated lumber, which is resistant to rot and insect infestation. It is relatively cheap and will last up to 15 years if properly maintained. The downside is that it requires yearly sanding and staining to keep it looking good.

Posts are vertical components that provide support for deck beams and the rest of your deck’s structure. They are typically made from pressure-treated wood or steel, and the size and spacing depends on the size and weight of your deck. Posts are usually installed on footings or a concrete or masonry base, and they should be braced with 2x lumber to prevent flexing.

Beams are horizontal structural components that support deck joists and the rest of your deck’s frame. They are typically made from pressure-treated lumber or steel, and the size and spacing depend on the size and weight of your deck. Beams should be connected to a ledger board, which is attached to your home with lag bolts. The ledger board should be flashed (wrapped with z-shaped vinyl) to prevent water damage. Joist hangers are metal fasteners that can be used to secure joists to the ledger board without notching the ends of the boards.

Installation

Before the contractor begins physical construction, they should consult with you to assess your needs and provide a portfolio of previous decks they have worked on. This will help you get a sense of their style and craftsmanship. They should also be able to tell you what types of materials they prefer to work with and give you ideas for the type of design you want.

Before starting, they will need to secure a building permit for the project. This is usually required for any deck that is over a certain height and square footage, and it may require inspections by local officials. This step is very important because it can save you a lot of trouble down the road. It may also help you if you ever decide to sell your home, as a properly built deck is an attractive selling point.

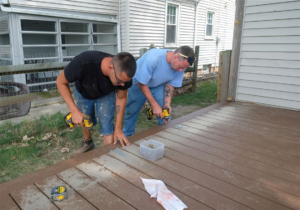
When it comes time to start the actual construction, a skilled contractor will ensure that the footings are anchored in proper locations. They will also use concrete to ensure the posts stay in place, and they will install a flashing that will protect against water damage and other issues. They will also fasten the joist hangers and lay out batter boards and mason’s strings. Once the location of each footing is established, they will cut and fit the rim joist’s inner 2x stock and fasten it to the hangers using joist hanger nails. Then they will set the footings and post bases.

The installers will then begin installing the planks of the deck. This can be tedious and a little mind-numbing, so it’s important to stand up every few courses to take in the big picture. They should also measure often to confirm they are cutting and fitting the planks correctly. They should also use a sawing guide for accuracy, but even this is not fail-safe. If you lose concentration for a moment, your blade could wander or bind and cause mistakes.

While you can opt for a traditional wood deck, many homeowners are turning to composite products to avoid maintenance. The main advantage of these is that they don’t rot, and they are more resistant to water. However, they may look less authentic than a cedar or redwood deck.

The Different Types of Concrete Stone Facing

When choosing a stone veneer style for your project, one of the biggest decisions you will make is whether you want mortar joints or a dry-stack look. Both offer advantages but require a different installation process to achieve a polished result. Visit Concrete Stonefacing for more information.

Always ensure your concrete or CMU/Poured-in-place walls are fully cured before installing stone veneer. Moisture control is critical to prevent efflorescence, which is the leaching of minerals into your stone cladding application.

Concrete Stone

Split-face concrete block is a popular choice in the commercial building industry. It can transform a wall into a layered work of art with its natural cleft texture that mimics the look of stone masonry. Split face blocks are available in various colors, including traditional stone-color greys, browns, and tans. They are also fire-rated for up to four hours by ASTM C90.

The blocks are molded face-to-face and then mechanically split to expose the internal aggregates. The aggregates are then sized and colored to achieve the desired aesthetic, giving split-face concrete blocks a distinctive look. While this type of block is pricier than a smooth concrete block, achieving that beautiful textured look for your project is worth the extra expense.

As with all concrete masonry, moisture intrusion is a real concern. While many properly constructed buildings with Renaissance stone or other decorative masonry have no issues with moisture, severe damage is more common in older homes and newer commercial structures built using split face block and concrete masonry units (CMU) and mortared with Portland cement.

Moisture damage in block structures is primarily caused by water wicking through the porous construction and evaporating into the structure. This creates a pressure imbalance that can lead to structural damage.

The simplest solution to preventing this problem is through proper waterproofing and moisture control techniques. This includes using proper flashings, self-adhered flashings, and a quality masonry sealant. Using the right type of mortar for your project is also essential. A good waterproofing mortar should have a latex additive to prevent water penetration.

Lastly, be sure to hire a reputable contractor. Compare at least three quotes before choosing a company, and check online reviews and experience. Ask for an itemized bid listing all costs; never pay in full upfront. This will help avoid shoddy artistry and other common problems associated with unlicensed contractors. Choose a licensed contractor with at least five years of experience for the best results. This will ensure you get the highest-quality artistry possible, ensuring your project’s longevity and durability.

Concrete sculpture is a creative and easy way to add beauty to your outdoor spaces. First, you must prepare a latex, aluminum, styrofoam, or plaster mold. Then, you must mix cement with other ingredients to create high-quality and durable concrete. Once you have the concrete ready, pour it into the mold and let it dry a bit. After this, you can begin carving your masterpiece. When you’re done, let it cure for a few days before you remove the mold.

Sculptured concrete is usually applied to walls or vertical surfaces and can be used in waterfalls, outdoor kitchens and fireplaces, man caves, and wine cellars. It also can be incorporated into driveways and walkways to give them a natural stone look. The best part about sculpted concrete is that it costs less than natural stone and can be molded to look exactly how you want it to.

For the best results, use Marble’s concrete release agent to help you get your castings out of the molds without any gummy residue or interference with surface detail. The water-soluble release can be added to your mix before you start pouring and will not interfere with the concrete’s curing process or leave any air bubbles in your finished castings.

One of the most popular sculpted concrete forms is the split face, typically used on walls or columns. It’s a highly decorative style of concrete that gives your project the appearance of real stone and is available in a wide range of colors. It’s also durable and low-maintenance, making it a great choice for outdoor areas.

Another common type of sculpted concrete is tuckpointing, which involves repairing joints between stones with mortar. This is often done on older, existing concrete structures that are deteriorating or have cracks. The tuckpointing process is usually done by hand using a trowel and grout bag. However, several machines can do the job faster and more accurately.

To create the look of aged stone, you can use a concrete stain to color the concrete after it’s been poured. This will give the concrete a faded and weathered look that creates a rustic stone appearance.

Color-wash concrete stone facing is a technique that can be applied to new construction or existing structures. This popular technique transforms retaining walls, driveways, and other exterior surfaces. It can also create an interesting pattern on a patio or pool deck. This project is easy enough for an ambitious DIYer to undertake. Just be sure to mask off any areas you don’t want to stain properly and follow the steps outlined in this blog post for the best results. Once the color wash is dry, finish your project with a layer of Penetrating Sealer to protect the surface.

If you’re using a manufactured stone veneer, it is important to understand that the product’s color will lighten during the curing process. This is due to the moisture content in the mixture. The higher the moisture content, the darker and more saturated the appearance of the stone face will be, but it will eventually lighten. Depending on weather conditions and location, this process may take up to six months.

Staining and color treatments breathe life into new construction projects, transforming drab buildings and public spaces. Whether the structure is a city skyscraper, a museum, or an airport terminal, Nawkaw’s color treatments are in use worldwide.

Natural stone is a durable material, but it can be susceptible to damage from the elements. During construction, it is vital to use proper protective measures, including sealing and cleaning, to ensure your stones will last a lifetime.

Cleaning stonework is a delicate task that requires gentle cleaning products. Avoid harsh cleansers that contain acid, ammonia, or bleach. Instead, use a mild dishwashing detergent and a soft brush or sponge. If the stone is outside, wet it with a hose to remove dirt and debris.

A popular DIY project is a faux stone wall, which can be done with a stencil and concrete overlay. This is a great way to add character and value to your home without the expense and weight of real stone.

Concrete Stonefacing is a popular siding material for retaining walls and fireplaces. It comes in various textures and can mimic the look of natural stone or be used to create an entirely new style. Many contractors offer concrete stone veneer installation services, but hiring a company with experience and a strong track record of success is important. In addition, it is essential to prepare the site before installing stone veneer, as this will help prevent water damage and ensure that your project is structurally sound for the life of the project.

Manufactured stone is a slurry of Portland cement, aggregates, and iron oxides baked in textured molds to look like real stone. This material is a great alternative to real stone, as it is more affordable and has similar strength and durability. It can also be customized to meet the specific needs of your project. In addition, it can be easily colored and has a wide range of texture options.

Real stone is more expensive than manufactured stone but offers a unique appearance that cannot be replicated with other materials. Each piece of stone has its distinct colors, textures, and patterns, which can enhance the beauty of your home and increase its value. In addition, real stone is a natural insulator and helps to keep the house cool during the summer months.

Before installing stone veneer, you should cover the entire area with a waterproofing barrier. Next, a metal lath should be placed over the barrier and nailed into the studs in a shingle fashion. The local building code should do this. Next, the lath should be coated with a scratch coat of mortar cement mix, creating a surface to which the thin stone veneer can adhere.

If your project is in a moisture-prone environment, it is recommended that you treat the manufactured stone with a silane-based, non-film-forming masonry sealer. This will help protect the material from chemicals, such as chlorine, that can cause discoloration. It is also a good idea to hose down the surfaces occasionally to remove any accumulated dirt or debris.

Navigation